


The Tailscale Kubernetes Operator
Table of Contents
Make your Kubernetes networking life easier with the Tailscale Kubernetes operator.
tl;dr
Modern Kubernetes networking involves multiple complex layers: physical networks, CNI plugins like Calico (handling BGP meshes, VXLAN, IPIP tunnels, and NAT), service meshes, and external access concerns. While the post dives into Calico’s implementation details in a homelab setup—showing how it manages IP pools, BGP peering, and cross-node communication—the Tailscale Kubernetes operator emerges as a surprisingly straightforward solution for secure service exposure, requiring just a simple annotation to make workloads accessible across your entire tailnet.
Here’s a diagram of my homelab Kubernetes setup, including Tailscale.
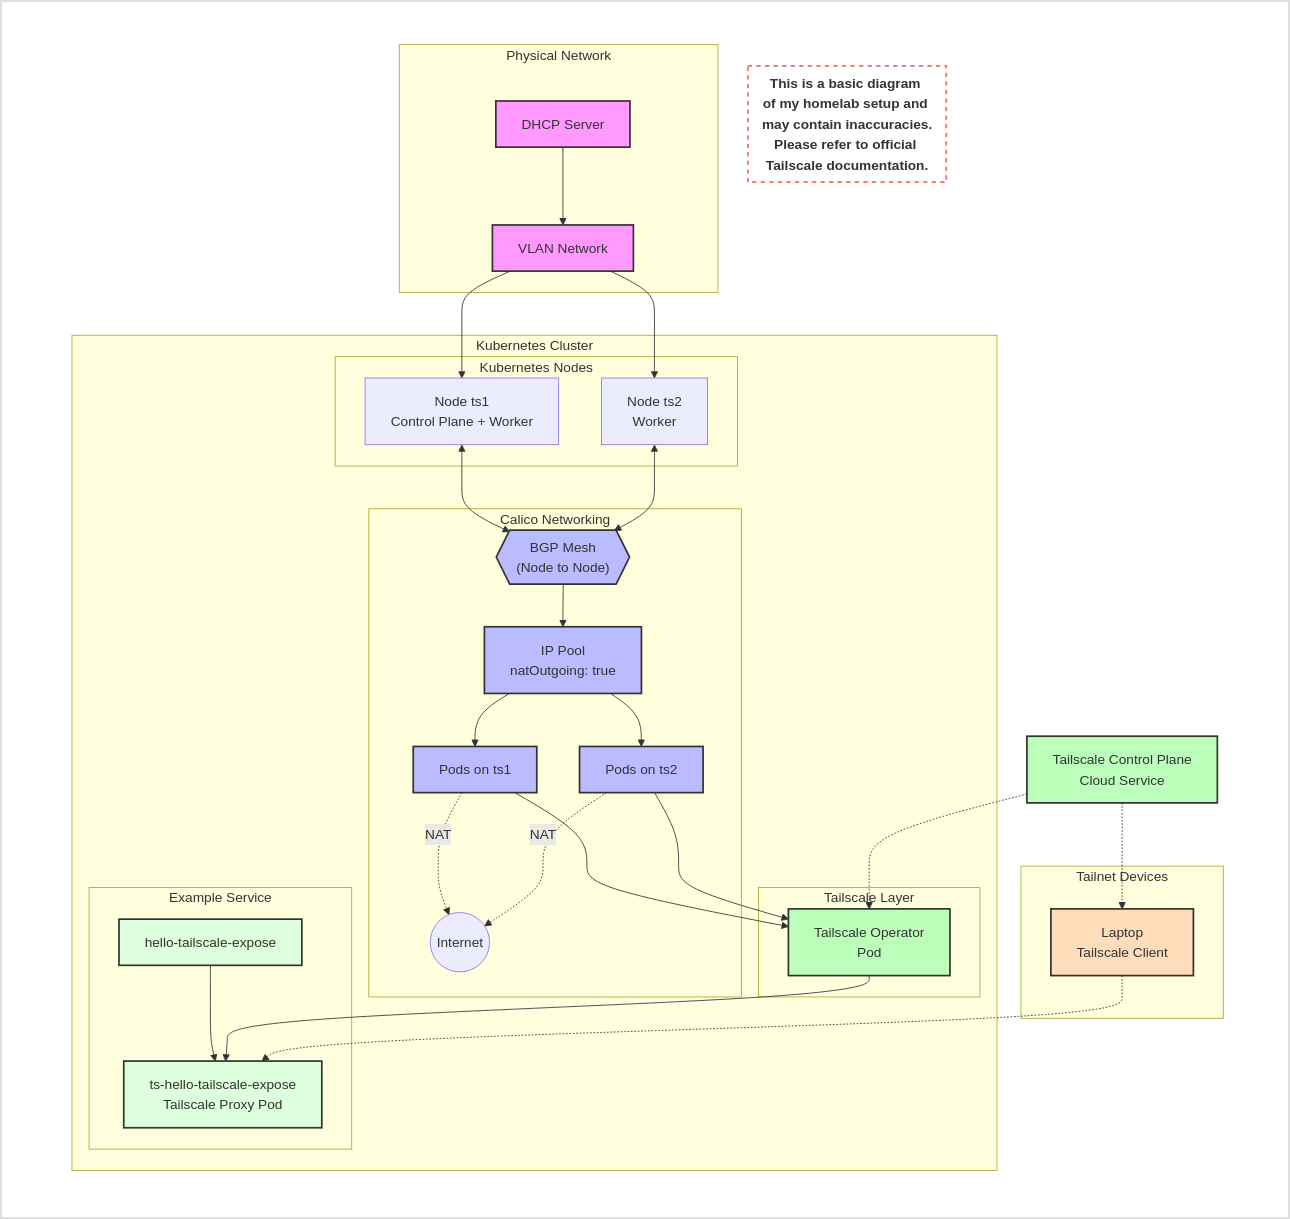
Click image to enlarge
Introduction
There are many layers to networking, especially when you add Kubernetes into the mix. In my relatively simple homelab setup, I have a physical network, a Kubernetes network based on Calico, and now I’m adding Tailscale. But there can be more layers, and more complexity.
Kubernetes networking is interesting because one of the early design decisions was that every pod should have its own routable layer 3 IP address. In some ways, this is a much simpler design for networking, just make everything layer 3 routable. Now we can run thousands and thousands of pods without having to worry about broadcast domains.
But in order to use Kubernetes, you have to set up a CNI–a container network interface. Kubernetes doesn’t actually do its own networking, it just uses the CNI plugin. And the CNI is, in many ways, free to implement the network in any way it wants, from straight Layer 3, to BGP meshes, to overlays like VXLAN and IPIP, or a combination of all of those and other things. So yes, each pod has its own IP address, but how that actually works is up to the CNI.
But there’s more!
- More interestingly, we still need to “expose” workloads, whether via a load balancer, ingress or other means.
- We have added the concept of service meshes.
- And we know we have the concept of zero trust networking.
- And what if we want to access services in other clusters?
- Or services running in Kubernetes need to access external services?
I’m not stating anything new here, Kubernetes is getting quite mature, as has the networking capabilities that we layer on top. There are a lot of interesting options available.
The Tailscale Kubernetes Operator
Tailscale makes creating software-defined networks easy: securely connecting users, services, and devices. - https://tailscale.com
First, I’ve written about Tailscale before.
Also check out my other post about using Tailscale with Kubernetes.
That post is more about building up a safe personal network combined with Mullvad VPN. This post is about securing and building connectivity with Tailscale’s Kubernetes operator.
Tailscale provides several options for setting up in Kubernetes, and one of them is the Tailscale Kubernetes Operator, which is what I’ll be using in this post.
But first, let’s get Kubernetes installed.
Installing Kubernetes
First, I’ll use my Kubernetes installer script, brilliantly named install-kubernetes, to set up a Kubernetes cluster. It simply installs a simple kubeadm-based cluster on Ubuntu 22.04 virtual machines, adding in Calico as the CNI.
root@ts1:~# git clone https://github.com/ccollicutt/install-kubernetes
Cloning into 'install-kubernetes'...
remote: Enumerating objects: 105, done.
remote: Counting objects: 100% (18/18), done.
remote: Compressing objects: 100% (11/11), done.
remote: Total 105 (delta 12), reused 12 (delta 7), pack-reused 87 (from 1)
Receiving objects: 100% (105/105), 23.90 KiB | 479.00 KiB/s, done.
Resolving deltas: 100% (52/52), done.
root@ts1:~# cd install-kubernetes
root@ts1:~/install-kubernetes# ./install-kubernetes.sh -s
Starting install...
==> Logging all output to /tmp/install-kubernetes-R21z3PlZYv/install.log
Checking Linux distribution
Disabling swap
Removing packages
Installing required packages
Installing Kubernetes packages
Configuring system
Configuring crictl
Configuring kubelet
Configuring containerd
Installing containerd
Starting services
Configuring control plane node...
Initialising the Kubernetes cluster via Kubeadm
Configuring kubeconfig for root and ubuntu users
Installing Calico CNI
==> Installing Calico tigera-operator
==> Installing Calico custom-resources
Waiting for nodes to be ready...
==> Nodes are ready
Checking Kubernetes version...
==> Client version: v1.31.0
==> Server Version: v1.31.0
==> Requested KUBE_VERSION matches the server version.
Installing metrics server
Configuring as a single node cluster
Configuring as a single node cluster
Deploying test nginx pod
Waiting for all pods to be running...
Install complete!

### Command to add a worker node ###
kubeadm join 10.10.10.250:6443 --token <REDACTED> --discovery-token-ca-cert-hash <REDACTED>
This gives me an initial Kubernetes node, which is both a control plane and a worker node. Next, I add another worker node, but I won’t show that output here.
So now I’ve got two nodes, ts1 and ts2.
$ k get nodes
NAME   STATUS   ROLES           AGE   VERSION
ts1    Ready    control-plane   15h   v1.31.0
ts2    Ready    <none>          15h   v1.31.0
Installing the Tailscale Kubernetes Operator
Setting up Tailscale
This includes the following steps (see the docs for more details):
- Setting up an OAuth client ID and secret
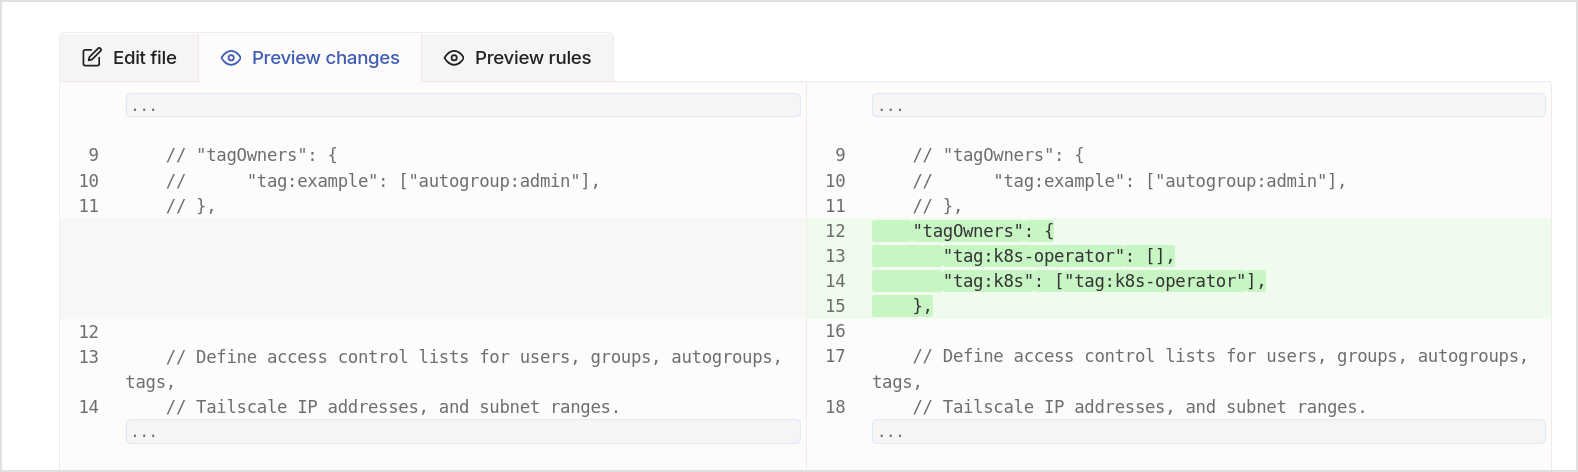
- Configuring tags in the ACLs
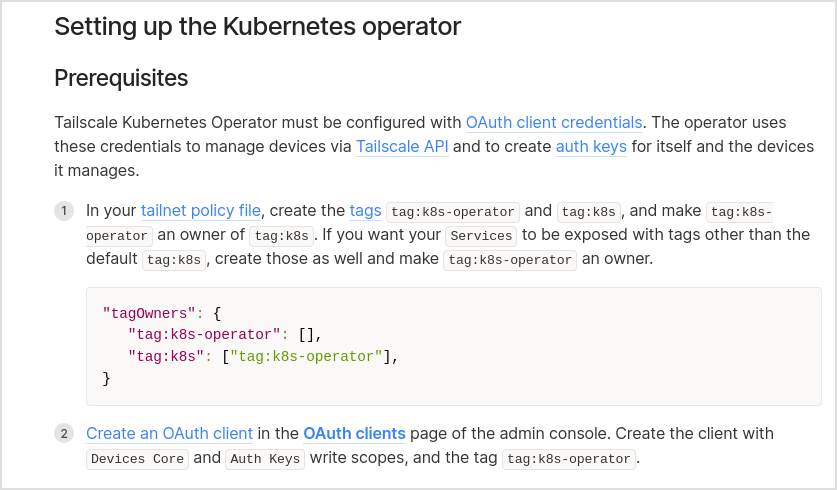
- Set up OAuth client ID and secret
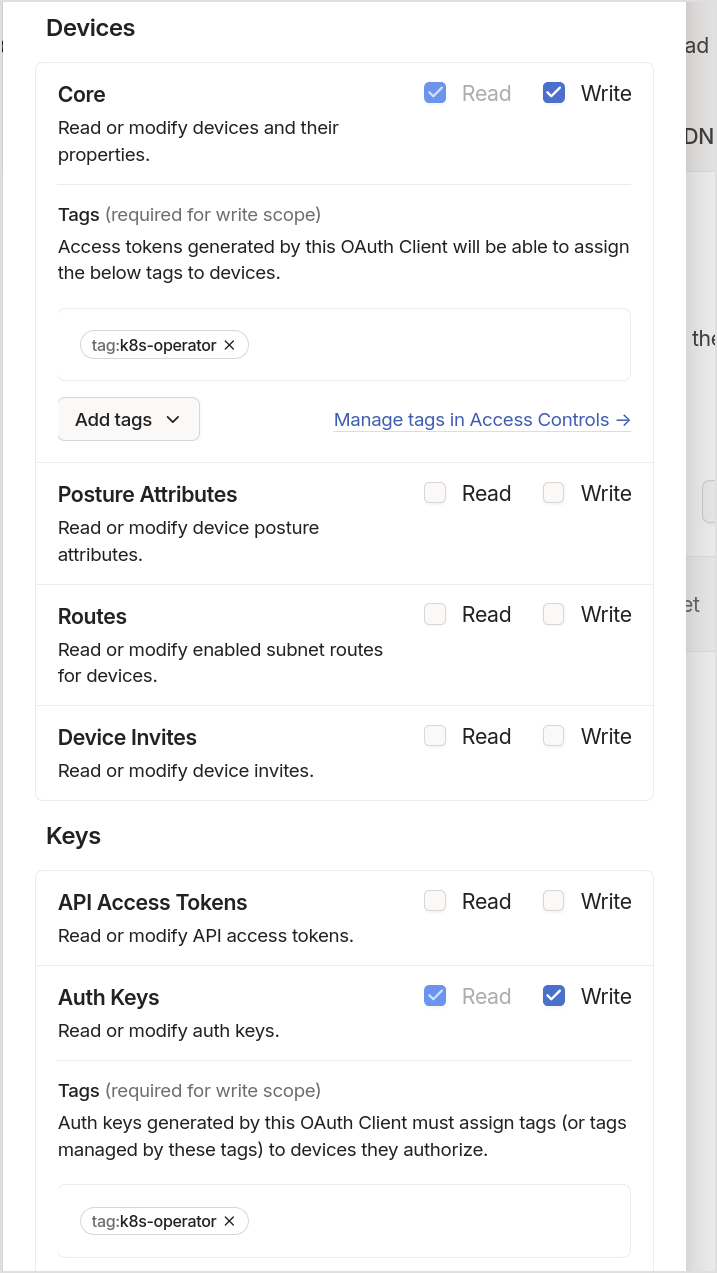
- Set up ACL tags
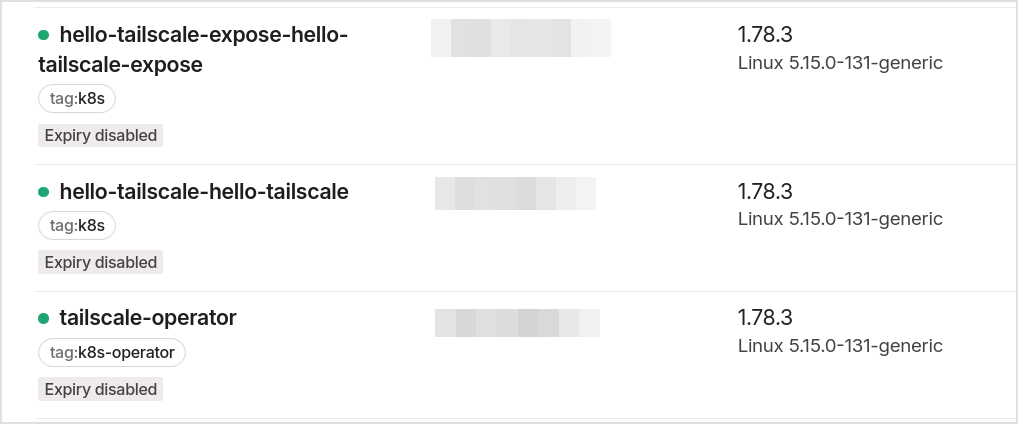
- See the results in machines once the operator is installed and some workloads are created (note that this is after the operator is installed, and some workloads are created)
Install into Kubernetes with Helm
I’ll show you my justfile commands for installation.
add-tailscale-helm:
    helm repo add tailscale https://pkgs.tailscale.com/helmcharts
    helm repo update

install-tailscale-operator:
    helm upgrade \
        --install \
        tailscale-operator \
        tailscale/tailscale-operator \
        --namespace=tailscale \
        --create-namespace \
        --set-string oauth.clientId="${TS_CLIENT_ID}" \
        --set-string oauth.clientSecret="${TS_CLIENT_SECRET}" \
        --wait
Thanks to Helm, very simple to install.
$ just install-tailscale-operator
What Does This Network Look Like?
In this section we’ll go over the layers. To visualize those layers, here’s a diagram of my homelab setup.
Disclaimer: This is a basic diagram of my homelab setup and is not completely accurate. Please refer to official Tailscale and Calico and Kubernetes documentation!
Physical Networking
The physical networking is straightforward: the two nodes/vms are on the same VLAN, and have direct access to each other. (I use Incus to manage my VMs.)
Calico Networking
The Calico configuration is what you get by default. Calico is VERY configurable, and you can do a lot of complex things with it, but this is the default deployment.
$ kubectl get ippool -o yaml
apiVersion: v1
items:
- apiVersion: projectcalico.org/v3
  kind: IPPool
  metadata:
    creationTimestamp: "2025-01-31T23:51:56Z"
    name: default-ipv4-ippool
    resourceVersion: "891"
    uid: 15bc140e-701b-4cb9-aea8-82e74925b997
  spec:
    allowedUses:
    - Workload
    - Tunnel
    blockSize: 26
    cidr: 192.168.0.0/16
    ipipMode: Never
    natOutgoing: true
    nodeSelector: all()
    vxlanMode: CrossSubnet
kind: List
metadata:
  resourceVersion: ""
or…
# calicoctl get ippool default-ipv4-ippool -oyaml
apiVersion: projectcalico.org/v3
kind: IPPool
metadata:
  creationTimestamp: "2025-01-31T23:51:56Z"
  name: default-ipv4-ippool
  resourceVersion: "891"
  uid: 15bc140e-701b-4cb9-aea8-82e74925b997
spec:
  allowedUses:
  - Workload
  - Tunnel
  blockSize: 26
  cidr: 192.168.0.0/16
  ipipMode: Never
  natOutgoing: true
  nodeSelector: all()
  vxlanMode: CrossSubnet
IP address management is handled by Calico.
# calicoctl ipam show --show-blocks
+----------+--------------------+-----------+------------+--------------+
| GROUPING |        CIDR        | IPS TOTAL | IPS IN USE |   IPS FREE   |
+----------+--------------------+-----------+------------+--------------+
| IP Pool  | 192.168.0.0/16     |     65536 | 15 (0%)    | 65521 (100%) |
| Block    | 192.168.131.64/26  |        64 | 8 (12%)    | 56 (88%)     |
| Block    | 192.168.153.128/26 |        64 | 7 (11%)    | 57 (89%)     |
+----------+--------------------+-----------+------------+--------------+
Default settings:
- VXLAN mode is set to CrossSubnet, meaning that Calico will only use VXLAN encapsulation when pods are communicating across different subnets.
- IPIP mode is set to Never, which means that IPIP tunneling is not used.
- The network CIDR is 192.168.0.0/16 with a block size of 26, giving 62 usable IPs in each block as managed by Calico.
natOutgoing: truemeans that outgoing traffic is NATed to the external IP address of the node.
So…
- Nodes communicate BGP routes over their physical network (10.10.x.x)
- Nodes get IPs from the configured pool (192.168.0.0/16)
- The physical network handles the actual packet delivery between the nodes
- There is NAT involved (multiple NATs actually)
# calicoctl ipam show
+----------+----------------+-----------+------------+--------------+
| GROUPING |      CIDR      | IPS TOTAL | IPS IN USE |   IPS FREE   |
+----------+----------------+-----------+------------+--------------+
| IP Pool  | 192.168.0.0/16 |     65536 | 15 (0%)    | 65521 (100%) |
+----------+----------------+-----------+------------+--------------+
# calicoctl node status
Calico process is running.

IPv4 BGP status
+--------------+-------------------+-------+----------+-------------+
| PEER ADDRESS |     PEER TYPE     | STATE |  SINCE   |    INFO     |
+--------------+-------------------+-------+----------+-------------+
| 10.10.10.246 | node-to-node mesh | up    | 23:55:06 | Established |
+--------------+-------------------+-------+----------+-------------+

IPv6 BGP status
No IPv6 peers found.
There are only two nodes, so the BGP mesh is, well, as small as it gets.
We can see all the pods and such and what hosts they are on, IPs, etc.
$ just show-pod-details
POD NAME                    POD IP          NODE NAME        NODE IP
-------------------------  --------------  ---------------  --------------
calico-apiserver-64497c8b94-2xlqq          192.168.131.72    ts1    10.10.10.250
calico-apiserver-64497c8b94-c7px8          192.168.131.71    ts1    10.10.10.250
calico-kube-controllers-7d868b8f66-85ldw   192.168.131.67    ts1    10.10.10.250
calico-node-b68ck                          10.10.10.246      ts2    10.10.10.246
calico-node-j5sw5                          10.10.10.250      ts1    10.10.10.250
calico-typha-764c8bcd98-pwnf4              10.10.10.250      ts1    10.10.10.250
csi-node-driver-2bg5q                      192.168.131.70    ts1    10.10.10.250
csi-node-driver-6hs69                      192.168.153.129   ts2    10.10.10.246
hello-tailscale-expose-74c4485894-xms5d    192.168.153.137   ts2    10.10.10.246
hello-tailscale-5c8bf6665c-7lqvj           192.168.153.131   ts2    10.10.10.246
coredns-6f6b679f8f-knnlg                   192.168.131.65    ts1    10.10.10.250
coredns-6f6b679f8f-sdrp6                   192.168.131.68    ts1    10.10.10.250
etcd-ts1                                   10.10.10.250      ts1    10.10.10.250
kube-apiserver-ts1                         10.10.10.250      ts1    10.10.10.250
kube-controller-manager-ts1                10.10.10.250      ts1    10.10.10.250
kube-proxy-gm8rh                           10.10.10.246      ts2    10.10.10.246
kube-proxy-lq5p9                           10.10.10.250      ts1    10.10.10.250
kube-scheduler-ts1                         10.10.10.250      ts1    10.10.10.250
metrics-server-5f94f4d4fd-rr92x            192.168.131.64    ts1    10.10.10.250
operator-6999975fd7-dxvv5                  192.168.153.130   ts2    10.10.10.246
ts-hello-tailscale-expose-db59d-0          192.168.153.136   ts2    10.10.10.246
ts-hello-tailscale-z5dfr-0                 192.168.153.133   ts2    10.10.10.246
tigera-operator-b974bcbbb-hrzv9            10.10.10.250      ts1    10.10.10.250
Tailscale Networking
Tailscale uses Wireguard to create a secure network.
Tailscale is built on top of WireGuard; we think very highly of it - https://tailscale.com/compare/wireguard
Tailscale takes Wireguard quite a bit further, dealing with all the other issues around modern networks, e.g. NAT (which can be brutal to deal with), and adding Access Control Lists (ACLs) and other features.
Tailscale takes care of on-demand NAT traversal so that devices can talk to each other directly in most circumstances, without manual configuration. When NAT traversal fails, Tailscale relays encrypted traffic, so that devices can always talk to each other, albeit with higher latency in that case. There is no need to modify firewalls or routers; any devices that can reach the internet can reach each other. (Tailscale traffic between two devices on the same LAN does not leave that LAN.) - https://tailscale.com/compare/wireguard
In the Kubernetes deployment we have a proxy pod that is setup for each exposed service by the operator–at least that is the way that I understand it.
$ k get pods -n tailscale
NAME                                READY   STATUS    RESTARTS   AGE
operator-6999975fd7-dxvv5           1/1     Running   0          140m
ts-hello-tailscale-expose-db59d-0   1/1     Running   0          80m
ts-hello-tailscale-z5dfr-0          1/1     Running   0          119m
The ts-hellow-tailscale* workloads are running in their own namespaces, above are the tailscale pods for those workloads.
Accessing Workloads With Tailscale
Here’s some justfile commands to curl the hello-tailscale service.
Note that this workload is using the Tailscale annotation to expose the service, but you can also use the Tailscale LoadBalancer service type, and a couple of other options I believe.
deploy-tailscale-hello-with-expose:
    #!/usr/bin/env bash
    set -euxo pipefail
    kubectl apply -f - <<'EOF'
    apiVersion: v1
    kind: Namespace
    metadata:
      name: hello-tailscale-expose
    ---
    apiVersion: v1
    kind: ConfigMap
    metadata:
      name: nginx-index-html
      namespace: hello-tailscale-expose
    data:
      index.html: |
        <h1>Hello from Tailscale Expose!</h1>
    ---
    apiVersion: apps/v1
    kind: Deployment
    metadata:
      name: hello-tailscale-expose
      namespace: hello-tailscale-expose
      labels:
        app: hello-tailscale-expose
    spec:
      replicas: 1
      selector:
        matchLabels:
          app: hello-tailscale-expose
      template:
        metadata:
          labels:
            app: hello-tailscale-expose
        spec:
          containers:
            - name: hello-tailscale-expose
              image: nginx:latest
              ports:
                - containerPort: 80
              volumeMounts:
                - name: nginx-index
                  mountPath: /usr/share/nginx/html
          volumes:
            - name: nginx-index
              configMap:
                name: nginx-index-html
    ---
    apiVersion: v1
    kind: Service
    metadata:
      name: hello-tailscale-expose
      namespace: hello-tailscale-expose
      annotations:
        tailscale.com/expose: "true"
    spec:
      selector:
        app: hello-tailscale-expose
      ports:
        - port: 80
          targetPort: 80
    EOF
And we can easily access that service from my workstation, which is on the tailnet!
📝 Note that one of these workloads I specified a loadbalancer for, and for the other I used the Tailscale expose annotation.
$ tailscale status | grep hello
100.80.241.127  hello-tailscale-expose-hello-tailscale-expose tagged-devices linux   -
100.85.85.53    hello-tailscale-hello-tailscale tagged-devices linux   idle, tx 532 rx 316
100.101.102.103 hello.ts.net         hello@       linux   -
$ curl hello-tailscale-hello-tailscale
<h1>Hello from Tailscale LoadBalancer!</h1>
$ curl hello-tailscale-expose-hello-tailscale-expose
<h1>Hello from Tailscale Expose!</h1>
And we can see that in this screenshot as well.

Conclusion
Tailscale solves a lot of problems for me, especially when it comes to using containers. Networking has become very complex. For example, in the past in my homelab I’d set up MetalLB to create a load balancer for applications. MetalLB is an amazing piece of technology (thank you to those that built and maintain it!), but I’d be managing IPs and trying to remember which ranges I’d allowed the loadbalancer to use, and inevitably I’d forget. Never mind that those workloads wouldn’t be accessible from my laptop–when I was at home on my workstation, sure, no problem, but when I was on the road I’d have Tailnet but no Kubernetes access. Now I have that too, plus the ability to use ACLs to control access to my Kubernetes cluster. Or, potentially, I can deploy apps that I will use, and be able to access them from my phone too. Very nice! Now I can deploy apps into Kubernetes and use them from any of my devices.
📝 Note that there are some things to think about when using Kubernetes, NAT, and Tailscale. Best to read this Tailscale blog post for more details.
Further Reading
- How to Secure Kubernetes Access with Tailscale
- Kubernetes, direct connections, and you
- How Tailscale Works
- How NAT Traversal Works
- Tailscale Webinar - NAT Traversal explained with Lee Briggs
- Calico Overlay networking
PS. Mermaid Diagram Code
Again, not a perfect diagram, but it’s a good start.
graph TB
    subgraph Disclaimer[**This is a basic diagram of my homelab setup and may contain inaccuracies.<br>Please refer to official Tailscale documentation.**]
        style Disclaimer fill:#fff,stroke:#f66,stroke-width:2px,stroke-dasharray: 5 5
    end

    subgraph Physical Network
        DHCP[DHCP Server]
        VLAN[VLAN Network]
        DHCP --> VLAN
    end

    subgraph Kubernetes Cluster
        subgraph Kubernetes Nodes
            Node1[Node ts1<br>Control Plane + Worker]
            Node2[Node ts2<br>Worker]
            VLAN --> Node1
            VLAN --> Node2
        end

        subgraph Calico Networking
            BGPBGP Mesh<br>(Node to Node)
            IPPOOL[IP Pool<br>natOutgoing: true]
            Node1 <--> BGP
            Node2 <--> BGP
            BGP --> IPPOOL
            Pod1[Pods on ts1]
            Pod2[Pods on ts2]
            IPPOOL --> Pod1
            IPPOOL --> Pod2
            Pod1 -.->|NAT| INTERNET
            Pod2 -.->|NAT| INTERNET
        end

        subgraph Example Service
            HELLO[hello-tailscale-expose]
            TS_HELLO[ts-hello-tailscale-expose<br>Tailscale Proxy Pod]
            HELLO --> TS_HELLO
        end

        Pod1 --> TS_OP
        Pod2 --> TS_OP

        subgraph Tailscale Layer
            TS_OP[Tailscale Operator<br>Pod]
            TS_OP --> TS_HELLO
        end
    end

    subgraph Tailnet Devices
        LAPTOP[Laptop<br>Tailscale Client]
    end

    TS_CTRL[Tailscale Control Plane<br>Cloud Service]
    INTERNET((Internet))

    %% Encrypted connections as dotted lines
    TS_CTRL -.- TS_OP
    TS_CTRL -.- LAPTOP
    LAPTOP -.- TS_HELLO

    classDef physical fill:#f9f,stroke:#333,stroke-width:2px
    classDef calico fill:#bbf,stroke:#333,stroke-width:2px
    classDef tailscale fill:#bfb,stroke:#333,stroke-width:2px
    classDef k8s fill:#fff,stroke:#326CE5,stroke-width:2px
    classDef device fill:#fdb,stroke:#333,stroke-width:2px
    classDef service fill:#dfd,stroke:#333,stroke-width:2px

    class DHCP,VLAN physical
    class BGP,IPPOOL,Pod1,Pod2 calico
    class TS_CTRL,TS_OP tailscale
    class Kubernetes_Cluster k8s
    class LAPTOP device
    class HELLO,TS_HELLO service