Manage docker hosts with shipyard
Table of Contents
Docker is a container management system. Containers are a form of virtualization, but they are not like typical virtualization that one would achieve with KVM or VMWare. I think it’s best to consider them as modeling processes instead of servers. If you haven’t experimented with Docker yet, here is a good blog post on the terminology used which should help to alleviate some of the confusion around what Docker actually does and how.
It’s pretty easy to install docker. Here I install it on Ubuntu Trusty 14.04.
vagrant@host1:~$ sudo apt-get install -y docker.io
And that’s it. Once that command completes the server is a docker host.
But what if we want to manage multiple docker hosts using one interface and/or API? What if we want ten docker hosts running and to be able to manage them all as though it’s one container-as-a-service system?
That’s where shipyard comes in.
Shipyard
Shipyard is a project that can manage multiple docker hosts. Quoting from the website:
Shipyard gives you the ability to manage Docker resources including containers, images, hosts, and more all from a single management interface. Shipyard can manage multiple Docker hosts giving the flexibility to build redundant, highly available applications.
There are actually several similar systems being worked on right now that can tie together multiple docker hosts. One example is Flynn which has flynn-host, another is OpenStack which can manage docker containers, yet another is CoreOS, Project Atomic is new…and there are more out there. Typically these systems will do much more than just manage containers (or jobs) but they will all have that functionality. (Feel free to correct me if I’m wrong.)
Setup the shipyard host
This is as easy as starting a container. The shipyard project has a pre-created and distributed shipyard docker container. All we have to do is install that image and run it. Note that this will download a few hundred megabytes of images if they do not already exist on the docker host.
vagrant@host1:~$ sudo docker.io run -i -t -v /var/run/docker.sock:/docker.sock shipyard/deploy setup
SNIP!
eba9b5f1d1d1: Download complete
08852c160ec2: Download complete
2cbf6e5024d8: Download complete
Shipyard Stack Deployed
You should be able to login with admin:shipyard at http://:8000
You will also need to setup and register the Shipyard Agent.
See http://github.com/shipyard/shipyard-agent for details.
</code>
</pre>
As the output says, the web gui can be accessed on the docker host and port 8000 with the default user/pass of admin/shipyard.
## Shipyard client
Now we need to install the shipyard agent on the docker hosts.
First, make sure Docker is listening on a localhost via tcp. By default--for security reasons--docker will only listen on a local socket.
Change the DOCKER_OPTS in /etc/default/docker to:
DOCKER_OPTS="-H tcp://127.0.0.1:4243 -H unix:///var/run/docker.sock"
Then restart docker. Docker should be listening on 4243.
vagrant@host1:/etc/default$ netstat -ant |grep 4243
tcp 0 0 127.0.0.1:4243 0.0.0.0:* LISTEN
Now that the shipyard host is up and Docker is listening on a tcp port, we can register an agent. I installed shipyard-agent in /usr/local/bin by downloading the [latest release](https://github.com/shipyard/shipyard-agent/releases).
vagrant@host1$ sudo ./shipyard-agent -url http://192.168.5.89:8000 -register
2014/05/25 14:36:37 Using 10.0.2.15 for the Docker Host IP for Shipyard
2014/05/25 14:36:37 If this is not correct or you want to use a different IP, \
please update the host in Shipyard
2014/05/25 14:36:37 Registering at http://192.168.5.89:8000
2014/05/25 14:36:37 Agent Key: b3d356b1294d4a729cd43beac8d7c01c
vagrant@host1$
Once the shipyard-agent with -register is run, it will appear in the shipyard web gui to be activated, but first lets run it with that key.
vagrant@host1:/usr/local/bin$ sudo ./shipyard-agent -address="192.168.5.89" \
-url http://192.168.5.89:8000 -key b3d356b1294d4a729cd43beac8d7c01c
2014/05/25 14:50:39 Shipyard Agent (http://192.168.5.89:8000)
2014/05/25 14:50:39 Listening on 192.168.5.89:4500
# it stays in the foreground
(Note that you would normally want to run shipyard-agent out of some kind of process supervisory system.)
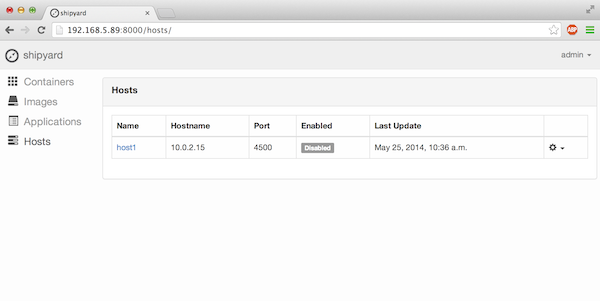
host1 now appears in the web gui.

In the web gui we can manually activate the host. Also note that it picked the eth0 IP address which when using Vagrant is not the one we want to use, so I manually set it to the eth1 IP address which in my case is 192.168.5.89. There doesn't seem to be an option at this time to specify the IP.
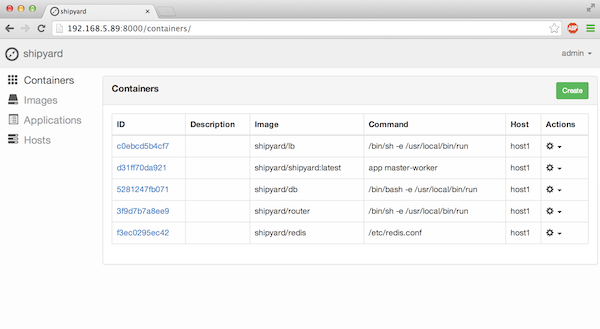
Once the IP is changed and the host is activated, we can click on containers and get a list of what is running.

Above we can see that the shipyard containers are displayed as running on host1, which is where the shipyard host was installed.
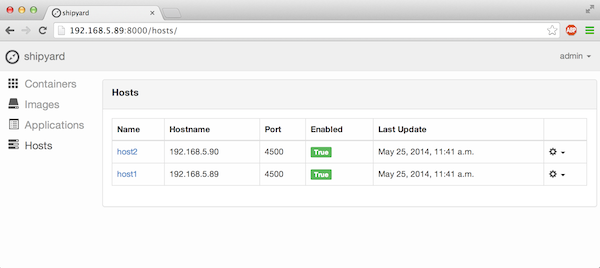
I then went through the same process to add the second host. Now shipyard is managing two docker hosts: host1 and host2.

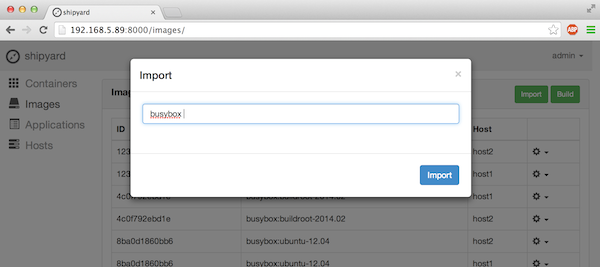
With shipyard managing the docker hosts, we can do things like pull the busybox image from the docker registry. By clicking on images->import and entering the tag of the docker image and clicking import again, the busybox image will be downloaded to both hosts.

vagrant@host1:~$ sudo docker.io images | grep busybox
busybox buildroot-2013.08.1 123fb16d32f8 26 hours ago 2.489 MB
busybox ubuntu-14.04 b9ca777960b9 26 hours ago 5.609 MB
busybox ubuntu-12.04 8ba0d1860bb6 26 hours ago 2.433 MB
busybox buildroot-2014.02 4c0f792ebd1e 38 hours ago 2.433 MB
busybox latest 4c0f792ebd1e 38 hours ago 2.433 MB
And on host2:
vagrant@host2:~$ sudo docker.io images | grep busybox
busybox buildroot-2013.08.1 123fb16d32f8 26 hours ago 2.489 MB
busybox ubuntu-14.04 b9ca777960b9 26 hours ago 5.609 MB
busybox ubuntu-12.04 8ba0d1860bb6 26 hours ago 2.433 MB
busybox buildroot-2014.02 4c0f792ebd1e 38 hours ago 2.433 MB
busybox latest 4c0f792ebd1e 38 hours ago 2.433 MB
## Shipyard cli
Most of what I have been showing with regards to shipyard is the web gui. But I'm not a big fan of web guis. I want to use virtual machines and containers programatically, or at the very least from the command line.
Shipyard has a golang [cli](https://github.com/shipyard/shipyard-cli) that is in "active development and has limited functionality," but let's try it out.
curtis$ git clone https://github.com/shipyard/shipyard-cli
curtis$ cd shipyard-cli
curtis$ make
github.com/gcmurphy/getpass (download)
github.com/shipyard/shipyard-go (download)
github.com/wsxiaoys/terminal (download)
curtis$ ls
Makefile cli readme.md shipyard
Now that the shipyard binary has been compiled we can use it.
curtis$ ./shipyard
NAME:
Shipyard CLI - Command line interface for Shipyard
USAGE:
Shipyard CLI [global options] command [command options] [arguments...]
VERSION:
0.1.1
COMMANDS:
login Login
apps Application Management
containers Container Management
images Image Management
hosts Host Management
config, cfg Show current Shipyard config
info, info Show Shipyard Info
help, h Shows a list of commands or help for one command
GLOBAL OPTIONS:
--username Shipyard API Username
--key Shipyard API Key
--url Shipyard URL
--api-version '1' Shipyard API Version
--config, -c '/Users/curtis/.shipyard.cfg' Config File
--version, -v print the version
--help, -h show help
First we login.
curtis$ ./shipyard login
URL: http://192.168.5.89:8000
Username: admin
Password:
Version (default: 1):
Login successful
The login command creates a .shipyard.cfg file for us so that we don't have to "login" again.
curtis$ cat ~/.shipyard.cfg
{"Username":"admin","ApiKey":"cc7d9720798af55c05684d240a7b5186405d0e80",\
"Url":"http://192.168.5.89:8000","Version":"1"}
Now we can run commands.
curtis$ ./shipyard hosts
host2 (192.168.5.90)
host1 (192.168.5.89)
curtis$ ./shipyard images
8ba0d1860bb6 busybox:ubuntu-12.04
6379130228c2 shipyard/lb:latest
180e6bd6c10d debian:jessie
b48b681ac984 shipyard/redis:latest
123fb16d32f8 busybox:buildroot-2013.08.1
b9ca777960b9 busybox:ubuntu-14.04
4c0f792ebd1e busybox:buildroot-2014.02
590fa59c6dc3 shipyard/router:latest
123fb16d32f8 busybox:buildroot-2013.08.1
8ba0d1860bb6 busybox:ubuntu-12.04
4c0f792ebd1e busybox:buildroot-2014.02
b9ca777960b9 busybox:ubuntu-14.04
626eb587cec1 shipyard/db:latest
bc62aa0fb727 shipyard/deploy:latest
30e0b59613ff shipyard/shipyard:latest
## Conclusion
In the end what we have done here is fairly basic--just install a shipyard host and a couple of clients. Certainly there are other systems that do the same thing and much more, but I think shipyard is a good way to get introduced to the concepts of a multihost docker system.
I'd also like to automate the deployment of shipyard, but have a couple things to figure out, such as how to register the agent automatically, activating the hosts without the web gui, as well as setup some sort of supervisory system for the agent. Also there are a few things that shipyard can do that I haven't touched on, such as the concept of applications.
Hopefully in the next couple of weeks I'll explore more with regards as to how shipyard works and what can be done with it, as well as consider how it compares and contrasts to other systems. I believe that containers are an important technology, and that there is room for simpler tools that can provide containers-as-a-service, perhaps as part of a PaaS system, or just on their own. There are many different and interesting ways to virtualize, compartmentalize, and control mulitihost systems.


